| |
Installing annotation server for Mechanical Turk
Description: The tutorial describes how to install the annotation server, setup testing fixtures, run unit tests against the server and create user accounts.Keywords: mturk, turk
Tutorial Level: ADVANCED
Next Tutorial: Here are more image annotation tutorials Basic image annotation tutorial Annotating images through command line tools Annotating images through ROS action
Contents
Prerequisites
- One machine with public IP for the web server.
- One machine for running ROS-based client code.
- ROS installed on both machines
Installing a server
Install the annotation server following these installation instructions.
Start a screen session on the server and run roscore and topic relay. By running these in screen we make sure they will survive ssh disconnects.
Run roscore:
roscore
Annotation topic relay will collect all annotations from all publishers in the web server processes and present them as a single topic /external/annotation :
rosrun topic_tools relay /django_crowd_server/annotation /external/annotation
Configuring client
Install ROS and make the mech_turk_ros package.
roscd mech_turk_ros
rosmake
The client needs access credential in ~/.ros/.mech_turk/auth.txt . For testing purposes, we need the test user created during the server installation. Add the following to ~/.ros/.mech_turk/auth.txt:
test: {
  server: SERVER_URL,
  user: mt_tester,
  pwd: TEST_USER_PASSWORD
}
Running unit tests
The unit tests for the server exist in mech_turk, cv_mech_turk2 and mech_turk_ros packages. They run only during "make test-future". First, we need to make the packages:
rosmake mech_turk cv_mech_turk mech_turk_ros
Then test raw server API:
roscd mech_turk
make test
make test-future
Then test image anntoation command line tools:
roscd cv_mech_turk2
make test
make test-future
Then test ROS API: action-based annotation API, image_snapper and session_2_messages:
roscd mech_turk_ros
make test
make test-future
If all the tests pass, the images reach the server correctly and the annotations are streamed back to the client.
Creating funding accounts
To post tasks on Mechanical Turk, we need to register on Amazon Mechanical Turk as a requester. After you complete the registration and put some money into Amazon account, you can get post HITs to Mechanical Turk.
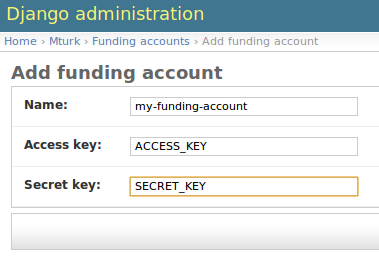
To link your account to the annotation server, you need AWS access identifiers. You need to find your keys. You need Access Key ID and Secret Access Key. To save them on the server, create a funding account in the admin interface (/admin/mturk/fundingaccount/add/). Choose a name and put the AWS access and secret keys in respective fields:

Creating new session
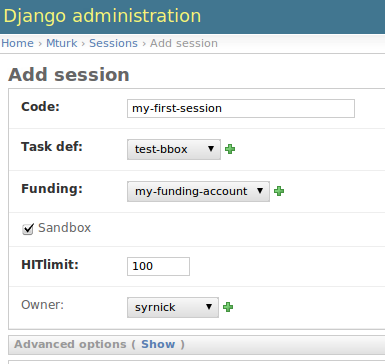
Creating a session is the easy part. Create a new session in the admin interface (/admin/mturk/session/add/). Choose a session name (e.g. my-first-session), funding account, task (e.g. test-bbox) and make yourself an owner of this session:

Once the session is saved, we will see it in our list of sessions (http://SERVER/mt/): 
We can click on it and get to the session dashboard.
Submitting test images
Session dashboard allows us to submit images directly. Scroll down to the Upload section and click on "Single image":

Choose an image an hit upload. The image is immediately posted for annotation. The session we created is marked "sandbox". This means that the HITs will appear on Mechanical Turk sandbox instead of Mechanical Turk production. The session has a link to the actual tasks running on Mechanical Turk:

Creating regular user accounts
Regular user are allowed to post data to their sessions and download any data from the system. Create a new user account in the admin interface (/admin/auth/user/add/). Add it to the mt-api-users group.


